

Here’s a quick way to brand your micro-learning videos: Add an intro and outro with your logo! We’ll walk you through all the steps. AND, if you’re a Compliance Design Club or Video Library member, you’ll get a PowerPoint template in each download that will make it even easier to create!
First, set up the slides
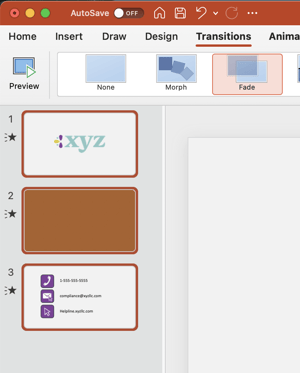
Open our PowerPoint template (.potx) and save a copy in the folder with your video assets. You’ll use them to upload into the 3 slides in the template.
Slide One: Select a background color and insert your logo into the center of the slide. We’ve added a placeholder where you can click on the shape and upload your logo. You may need to resize the logo by going to "Crop" and adjusting it to fit within the placeholder boundary. If you’re pasting in your logo and need to delete the color around it, check out this guide.
![]()
Slide Two: Insert your video by clicking on the placeholder and uploading your video. It should appear and cover the whole slide.
Slide Three: Update the colors of the icon backgrounds, and then type in your contact information. We’ve added placeholders for phone, email, and web.
Next, add animations & timing
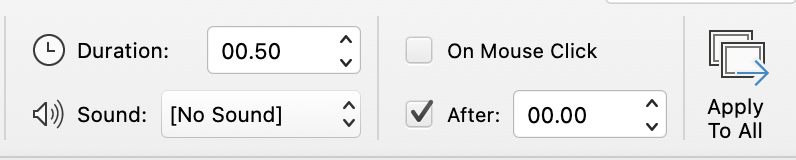
You can add transitions to all slides
- Select all slides on the sidebar.
- Go to the transitions tab and select “Fade”.
- Set the transition duration time to 00:50.
- Click on “After” instead of “On Click” so one slide will automatically transition to the next.
- Then, apply these transition settings to all slides.
Animations for Slide One
- Select your logo.
- Go to Animate > Fade.
- Open up the animation pane to view and make adjustments to your animation.
- Under “timing”, use the same settings...
- Start: With Previous
- Duration: 0.5 seconds (very fast)
- Delay: 0 seconds
- Repeat: none
- Go to Animate > Exit Effects > Fade.
- Under “Timing”, use the same settings as the Fade In animation, but add a Delay of 4 seconds.
Animations for Slide Two
- Select the video.
- Go to the “Playback” tab and set the video to: "Start: Automatically".
Animations for Slide Three
- Select all of the items on the slide by dragging a square with the selection tool over them or by clicking Ctrl+A.
- Add the Fade In animation to all the items at once. They should all appear with a “1” in the animation pane.
- Under “timing”, use the settings:
- Start: With Previous
- Duration: 0.5 seconds (very fast)
- Delay: 0 seconds
- Repeat: none
- Now the items will appear with a “0” in the animation pane. While still selecting all the shapes, go to Animate > Exit Effects > Fade.
- Under “Timing”, use the same settings as the Fade In animation, but add a Delay of 4 seconds.
Animations for Slide Four
- After you’re done adding transitions and timing to Slide One, right click and duplicate this slide and move it to the end.
- This will be your final outro after the contact slide.
Finally, export your video!
- Go to File > Export and change the file format to MP4.
- Confirm the settings are:
- Video Compression Type: H.264
- Quality: Presentation Quality (W 1920 H 1080)
- Timing: Use Recorded Timings and Narrations
- Seconds spend on each slide without a set timing: 5

Bonus: Working with Captions
Captions when exporting to MP4
When exporting to MP4 from PowerPoint, you’re unable to export burned in captions along with them. So, if you want burned in captions, make sure to upload the right version with "open captions" (OC). Check out our guide on using captions with your videos here.
You can also use your SRT file for closed captions! For that, you should open the version with "closed captions" (CC). You may just need to adjust the timing to add space for your intro before the video starts. Here’s how to do that:
- Create a copy of the SRT caption file(s) for this video, and open it in a text editor.
- Add 4 seconds to every time marker in the file.
- Save and close the file, then rename it to what you named your video.
Captions in a PowerPoint presentation
If you’re going to be presenting your video as a PowerPoint presentation, you can upload the captions directly into PowerPoint! And while you don’t have to adjust the timing, there are a few other adjustments to make.
Creating the VTT caption file for PowerPoint
- Create a copy of the SRT caption file(s) for this video, and open it in a text editor.
- Add “WEBVTT” two spaces above the first line.

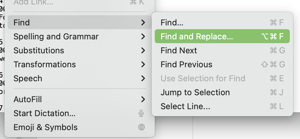
- The VTT format processes the time formatting with periods instead of commas, so you may also need to do a "Find and Replace" for the commas in the time stamps.

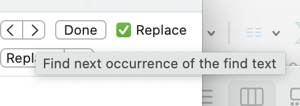
- Tip: Make sure you’re not accidentally replacing all and removing commas from your script altogether. You can skip items by hitting the right arrow.
- Save and close the file, then rename it so the file extension reads .vtt instead of .srt.

Adding a VTT caption file to PowerPoint
- Go to the PowerPoint slide with your video.
- Click the “Playback tab” in PowerPoint.
- Click the “Insert Captions” button.
- Upload your .vtt file.
- Tip: If you have any issues uploading the vtt file, check out this video tutorial on how to convert an SRT to VTT for more help.
- Make sure you turn on captions by clicking the CC button on the bottom right of the video player, and checking off the line with the name of your caption file.
And that's all there is to it!