
1 minute read

Some of our more complex PowerPoints (like the Invoice Training Module for Managers) use tables for organizing text (rather than several tiny textboxes, which would not be fun for you to edit!). If you run into this, don’t panic! We set them up so that they are super practical for you to make edits. And we’ll show you how to do it!
Editing copy in a table
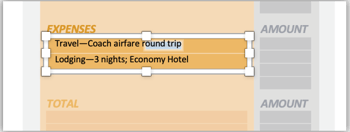
- Click on the table, and you should see a white frame around it.
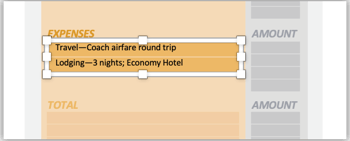
- Click into one of the rows, and start editing.
Adding rows in a table
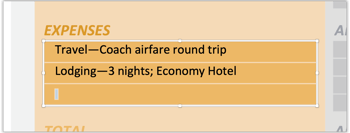
- Click into the row above or below the row you want to add.
- Right-click, select “Insert”, then “Insert Rows Below” or “Insert Rows Above”.
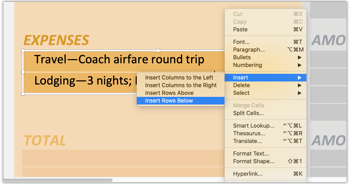
- A new row will be added, and you can start typing in the content you need.
Deleting rows in a table
- Click into the row you want to delete.
- Right-click, select “Delete”, then “Delete Rows”.
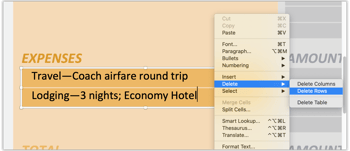
Tip: If you want to delete multiple rows, click into one cell, highlight all the rows you want to delete, and then repeat step 2.
Changing the background color of a row in a table
- Click into the table.
- Right-click, and select “Format Shape”.
- Highlight the row you want to change.
- In the “Format Shape” panel, select “Fill”, and make sure “Solid fill” is selected.
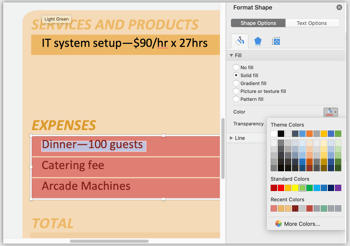
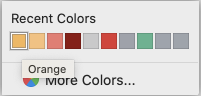
- Click on the paint-bucket icon.
- Select the color you want to use.
New to Broadcat? Hey, thanks for checking us out! You may have found this page while searching for ways to edit tables in PowerPoint. If so, we hope this info is helpful for you! If you work at an organization which has a compliance department, be sure to let them know about us!